

A cracked floor tile is rarely “just a crack.” It is usually your floor telling you something about impact, movement, or installation – and the right fix depends on which one you are dealing with. If you patch the surface but ignore the cause, the crack often comes back (sometimes with friends).
This guide walks you through how to fix cracked floor tile in a way that actually holds up in real Idaho households – wet boots at the entry, kids dropping things in the kitchen, and seasonal movement that can show up in older homes.
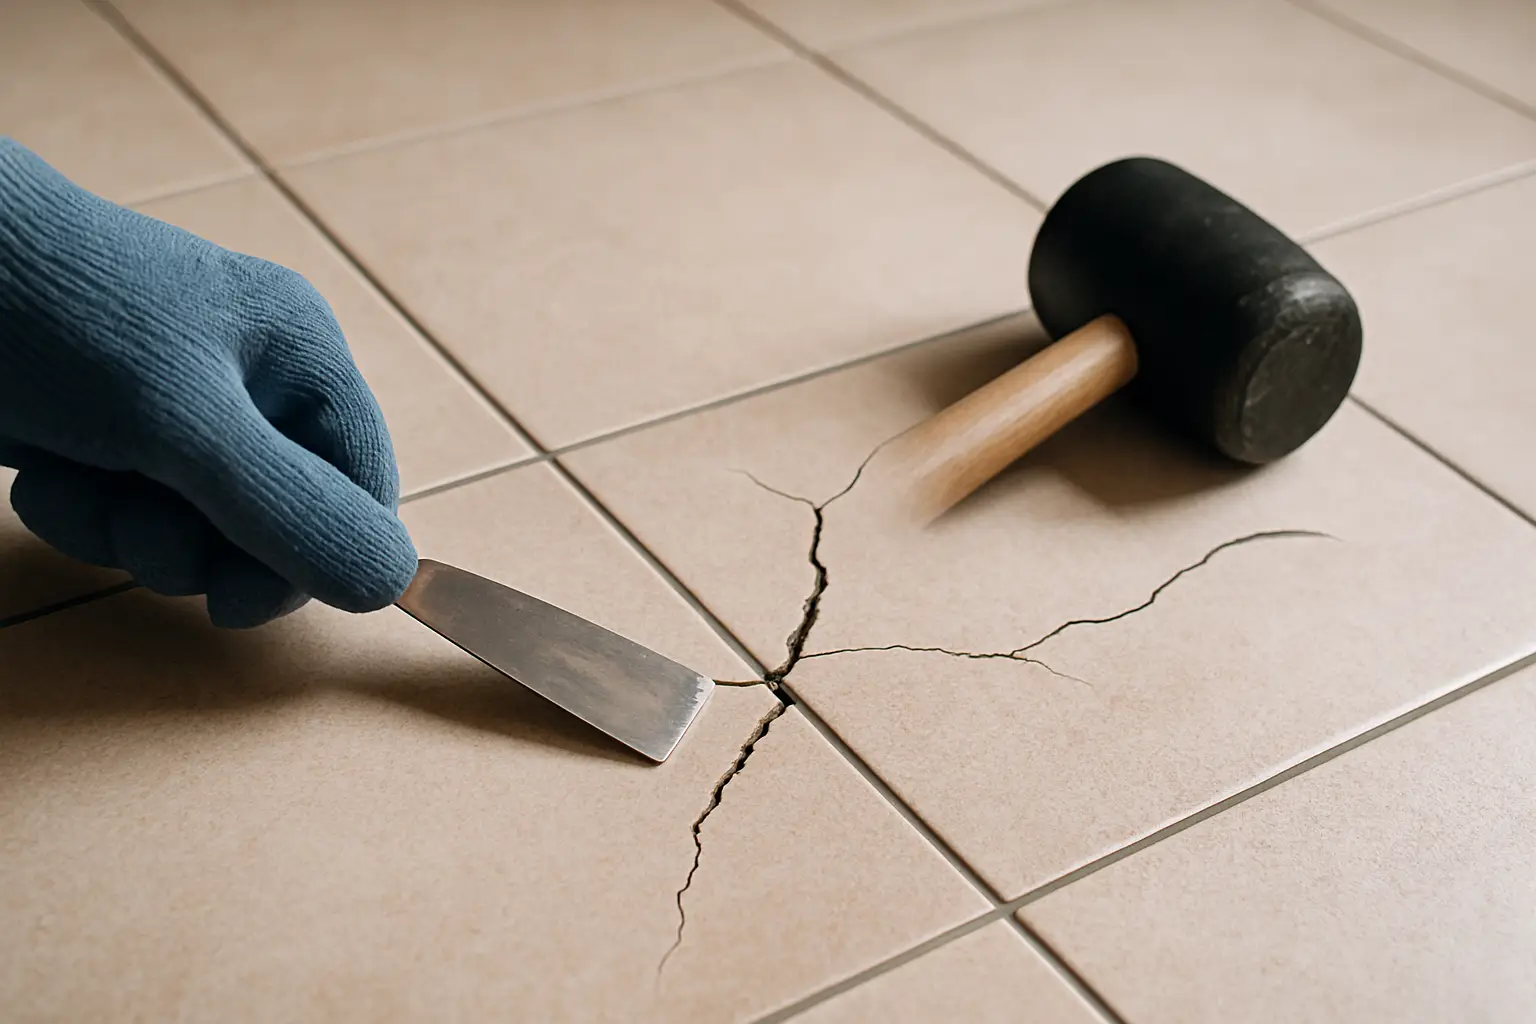
First: figure out what kind of crack you have
Start with a close look and a little detective work. The goal is to decide whether you can repair the tile in place, or whether replacing the tile (and possibly addressing the substrate) is the only responsible move.
Hairline cracks that do not feel sharp and do not shift underfoot are often cosmetic. They can happen from a small impact or a glaze-level fracture. But a crack that you can feel with your toe, one that widens, or one that crosses multiple tiles is more likely tied to movement underneath.
Press down around the tile with your hand and then your foot. If you feel any “click,” flex, or hollow sound compared to surrounding tiles, that is a red flag for a bond issue or a subfloor problem. Also check grout lines near the crack. Crumbling grout, a gap opening at the edge, or grout that is cracking in a straight line can point to deflection or insufficient underlayment.
If the tile is in a wet area (bathroom floor, laundry, entryway) take the crack seriously. Water finds paths you cannot see. A small crack can become a slow leak into the underlayment, which leads to swelling, loss of bond, or moldy odors over time.
Decide: repair in place or replace the tile
Most homeowners hope for a quick cosmetic repair. Sometimes that is reasonable, but it depends.
If your crack is truly hairline, the tile is solid with no movement, and you mainly want it to look better, you can use a color-matched epoxy or a tile repair kit to fill and disguise the crack. This is a “hide and seal” approach. It can look surprisingly clean from a standing height, but it is not the same as restoring the strength of the tile.
If the tile is loose, sounds hollow, has lippage developing (one edge slightly higher than another), or the crack keeps spreading, replacement is the better option. Replacing a single tile is also the right move when the tile is in a high-traffic lane and you want a long-term fix that does not keep catching dirt.
A practical note: replacement works best when you have spare tiles from the original install. If you do not, you may still find a close match, but dye lots change. In that case, we often recommend pulling a tile from a closet or under an appliance and putting the “close match” in the hidden spot.
How to fix cracked floor tile with a surface repair (hairline cracks)
If you have confirmed the tile is stable, clean, and not moving, a surface repair can improve the look and help keep moisture and grime out of the crack.
Clean the tile thoroughly with a non-oily cleaner and rinse well. Any residue will keep epoxy from bonding. Let the area dry completely.
Use painter’s tape along both sides of the crack to keep the repair neat. Mix your epoxy or use the kit as directed, then work it into the crack with a plastic putty knife or a razor blade held at a shallow angle. Your goal is to push the material down into the crack, not just skim the top.
Wipe excess immediately with a damp cloth (or the solvent specified by the product) and then remove the tape before it fully cures, so you do not tear the edge. Some kits include tint. If you take your time matching color, you can get a finish that is hard to notice unless you are looking for it.
Trade-off: this repair is cosmetic and protective. If the tile cracked from movement, even a perfect epoxy fill can re-crack later.
How to replace a cracked floor tile (the long-term fix)
Replacing a single tile is straightforward in concept, but it is easy to chip surrounding tile, gouge the underlayment, or set the new tile slightly high. The difference between “it’s fine” and “that looks professional” is patience and clean prep.
Gather materials before you start
You will typically need a replacement tile, grout matching the existing color, thinset mortar appropriate for your tile (often a polymer-modified thinset), a grout saw or oscillating tool with a grout blade, a hammer, a cold chisel, a margin trowel, notched trowel, spacers, a level or straightedge, and a sponge.
If your floor uses a membrane or specific underlayment, be ready to protect it. Damaging a waterproofing layer in a bathroom can turn a “one tile” job into a bigger repair.
Step 1: remove the grout around the cracked tile
This is where most DIY repairs go wrong. If you do not free the tile from the grout joints, you end up transferring force to adjacent tiles and cracking them too.
Use a manual grout saw for control, or an oscillating tool if you have a steady hand. Remove grout all the way to the edges of the tile on all four sides. Vacuum dust as you go so you can see what you are doing.
Step 2: break the tile in the center and work outward
Wear eye protection. Place a piece of tape over the crack to help contain shards, then tap the center of the tile with a hammer to fracture it. Start removing small pieces from the center toward the edges. Keep the chisel angled down into the tile, not sideways toward neighboring tiles.
If the tile is very well bonded, this part takes time. Rushing is how you chip the next tile.
Step 3: remove old thinset and inspect what is underneath
Once the tile is out, scrape the old thinset down so the new tile will sit at the same height as the rest of the floor. The surface should be flat and solid.
Now check for the reason the tile cracked. Is the underlayment crumbling? Is there a dip? Do you see signs of moisture? If the thinset coverage looks spotty (you see ridges with big empty voids), that can cause weak points that crack under load. If the subfloor feels springy, the structure may be deflecting more than tile likes.
This is an “it depends” moment. If you discover movement or water damage, replacing the tile without addressing the underlying problem is a temporary win.
Step 4: set the new tile
Mix thinset to the right consistency. Apply it with a notched trowel sized for your tile. For many floor tiles, back-buttering the tile (a thin coat on the back) helps achieve better coverage and reduces voids.
Press the tile into place and shift it slightly to collapse the ridges. Use spacers so joints match. Then check height with a straightedge across neighboring tiles. If the tile is too high, lift it, remove a little thinset, and reset. If it is too low, add thinset. This is where a craftsmanship-first approach shows.
Clean thinset out of the joints before it hardens. Let the tile cure undisturbed for the thinset’s recommended time (often 24 hours).
Step 5: grout and seal as needed
Grout the joints to match existing. Tool it to the same profile as surrounding grout lines, then wipe with a damp sponge in light passes. Let it cure fully.
If you have cement-based grout and it is not already sealed, a grout sealer can help with staining resistance. In bathrooms and entries, that extra protection is worth it.
When a cracked tile is a symptom of a bigger issue
Some cracks are telling you the floor system needs attention, not just a tile swap.
Cracks repeating in the same area, cracks that run in a line across multiple tiles, or tiles that sound hollow often point to subfloor deflection, inadequate underlayment, missing movement joints, or poor thinset coverage. In those cases, the fix may involve reinforcing the subfloor, adding the correct tile underlayment, using a crack isolation membrane, or correcting expansion gaps.
If this is a bathroom floor, pay attention to waterproofing. A cracked tile near a tub, shower, or toilet flange can allow water intrusion, and that can quietly degrade the floor until you see soft spots or staining.
What you can do to prevent future cracks
Tile is durable, but it is not forgiving. Small choices make a big difference.
Use floor-rated tile in floor applications and confirm the subfloor meets deflection requirements for tile. Keep heavy impacts to a minimum in brittle tile areas, especially around corners and cutouts. In remodels, we plan for movement joints and transitions so the floor can expand and contract without stressing the tile.
If you are already seeing scattered hairline cracking, it may be time to evaluate whether the floor needs a more comprehensive reset instead of spot repairs.
When to call a pro (and why it saves money)
If you do not have matching tile, if the tile is in a waterproofed bathroom, or if you suspect the floor is moving, it is worth getting experienced eyes on it. The cost of a misstep is not just one broken tile – it can be a compromised membrane, a damaged subfloor, or a repair that never quite sits flush.
For homeowners in Meridian, Boise, Nampa, and nearby communities who want a clean, level repair that blends in and holds up, My Contractor LLC can assess the cause, replace the tile with precision, and advise if the crack is pointing to a bigger underlying issue.
A cracked tile is annoying, but it is also useful information. Treat it like a small warning light: handle it carefully, fix it correctly, and your floor will keep doing its job quietly for years.